An embroidery machine is a device used to add decoration or personalization to clothing, home furnishings, and other textiles. Learning how to use an embroidery machine can be a daunting task because it often requires some experience. In the process of embroidery, most machines work automatically and perform all the tasks on their own. However, you still need to adjust some settings properly for the desired outcome. The best way to learn how to use an embroidery machine is by reading a step-by-step guide.
This article will give you a step-by-step guide on how to use an embroidery machine, so you can start designing your clothing with ease! Without delaying anymore let’s get started.
Properly Adjust and Secure the Parts of Your Embroidery Machine
Before you can begin embroidering your design, you will need to adjust some components of your embroidery machine to properly complete your embroidery work. The needle bar needs to be adjusted so that it is parallel with the feed dog or else the threads may get caught on each other causing.
To use computerized embroidery, the first thing you’ll need to get started is an embroidery frame. Larger embroidery designs can be done on a larger frame, while smaller ones should be put on a smaller one. In the case that your arm is not comfortable, you may need to switch it out. The embroidery arm is attached to the frame. Pull it out and click it back in as needed during stitching.
Insert an Embroidery Specific Needle into Your Machine
A needle is a critical tool for embroidery. An embroidery-specific needle will prevent thread breakage and ensure the end result is as beautiful as possible. For the thread, you can use regular thread or embroidery thread. But Embroidery thread makes stitches look more polished with its sheen! For your embroidery design, you can either use a pre-programmed pattern on your machine or you can also download designs online and import them to your machine via USB port.
Properly Setting Up the Embroidery Machine
There are many similarities between setting up an embroidery machine and a sewing one. Both machines need to be connected to power supplies. Some embroidery machines can also be connected to a computer via a USB port or a cable. Most of them come with pre-installed embroidery software that has been well tested for any errors or bugs so you don’t have to worry about these issues when starting out!
Thread the Bobbin Properly
Embroidery machines are all different, so it’s important to learn how yours works. You’ll need to thread the bobbin just like you were taught in your machine manual. If the bobbin thread is visible on both sides of the fabric, it means that you have not installed your bobbin correctly. And this error can lead you to the breakage of the needle you’re using in your embroidery machine.
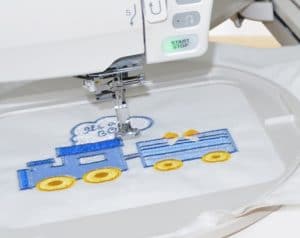
Now Select the Design and Start Your Embroidery
Choose the embroidery design you want to be done. Modern embroidery machines come with a variety of built-in embroidery designs. You can also import further designs via a USB port from your computer to these embroidery machines. These modern machines have made the process of selecting an embroidery design very easy and simple. It is of utmost importance that you learn how to use an embroidery machine by using it yourself.
Final Verdict
We hope this guide about how to use an embroidery machine has been helpful for you. The steps outlined in this post are designed to help you get started with embroidery. We hope that by following these simple instructions, you will be able to produce beautiful embroidered projects for yourself or your customers! If there is something we have left out or if you need more information about any of the other aspects of an embroidery machine, then you can leave a comment below this blog post and we will try our best to answer you as soon as possible.